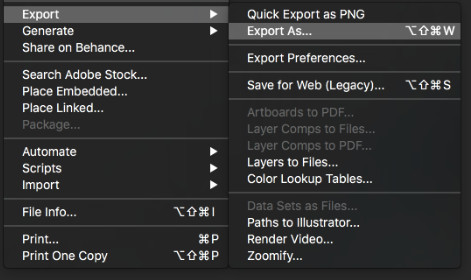
In 2015, Adobe changed the way that image optimization is handled in Photoshop from the previous Save for Web and Devices option to an Export As… method.
To export an image navigate to: File > Export > Export As…
I was curious what the difference in file size would be when comparing an image saved with File > Save versus File > Export so I tested it out and was amazed. Here are my results:
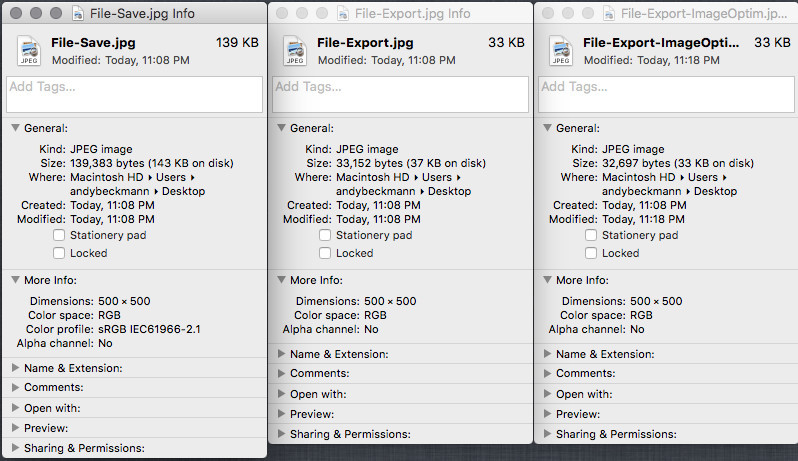
Unbelievable! I was able to eliminate more than 100KB from my 139KB image, reducing it down to 33KB.
Using the export method of saving images is necessary to keep page weight low.
Tip 1: Choose the appropriate file format
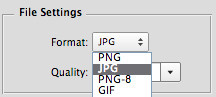
The image file format should be determined by the contents of the image. Here are a few examples:
- PNG: If a background needs to be transparent, then you need to save the file as a PNG. This is going to produce a larger file than if the image didn’t require a transparent background.
- GIF: If the file needs to be animated, then you need to save the file as a GIF. More on animation later in the post.
- JPEG: If the image doesn't need to have a transparent background or be animated, use JPEG. If the background is transparent then Photoshop will fill it with white to fill the image.
Tip 2: Adjust the image quality
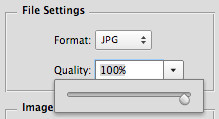
Base the quality on the complexity of the image being saved.
For example, a simple two-color image usually doesn't always need a quality of 100% because a quality of 50-75% might still visibly look the same.
My recommendation is to adjust this level until you reach the lowest quality that doesn’t experience any loss in detail.
Likewise, a complex image with lots of action will probably need to be saved closer to 100% quality. Be ware that the file size is increased when the quality is increased.
My point here is that we don't always need to save our images with 100% quality. When we misuse these tools available to us in Photoshop we face creating a compounding issue that might be costly to solve later.
Tip 3: Run the image through ImageOptim
ImageOptim is a 3rd party app that eliminates any metadata still attached to your image. Dragging the file into this app will usually trim off 3-5% of the file size. This helped out a lot more before the Save for web and devices method was depricated.
Animation
Lastly, to address animation. Some animation can be handled by creating a GIF and using an tag, but generally more complex animations on the web require the use of SVG, CSS, and Javascript.
Closing Thoughts
Once the image has been saved we can also do a lot of neat tricks with CSS to implement these images the way that we want. This helps both to optimize the file size for different sized devices and also make sure that the intended art direction of each image is maintained while the images are resized to fit different devices.